Home Assistant
Monitor and control Home Assistant entities from the bar. Requires qt6-websockets.
About
Home Assistant
Monitor and control your Home Assistant entities directly from the Noctalia bar.
Features
- Real-time updates - WebSocket connection with live
state_changedevents - Entity controls - Toggle lights, switches, fans, locks, covers, and input booleans
- Light controls - Brightness and color temperature sliders with live tooltip feedback
- Automations & Scripts - Trigger automations and scripts with a single tap
- Entity browser - Browse and search all 90+ entities from your HA instance, pin/unpin with one click
- Smart reconnect - Exponential backoff reconnection (5s → 10s → 20s → 60s cap)
- Auth error handling - Distinct states for disconnected, connecting, auth failed, and no entities pinned
Requirements
- Noctalia Shell ≥ 3.6.0
- System package:
qt6-websockets - Home Assistant with WebSocket API enabled (enabled by default)
- A Home Assistant Long-Lived Access Token
Installing qt6-websockets
# Arch Linux / Manjaro
sudo pacman -S qt6-websockets

# NixOS - add to your configuration
environment.systemPackages = [ pkgs.qt6.qtwebsockets ];
Installation
Via Noctalia Plugin Manager (recommended)
- Open Noctalia Settings → Plugins tab
- Find Home Assistant in the plugin list and click Install
- Enable the plugin and add the widget to your bar
Manual Installation
# Clone into your plugins directory
git clone https://github.com/noctalia-dev/noctalia-plugins ~/.config/noctalia/plugins/hassio

# Add to plugins.json
Then add to ~/.config/noctalia/plugins.json under "states":
"hassio": {
    "enabled": true
}
Restart Noctalia:
killall qs && qs -p ~/.config/noctalia/noctalia-shell
Configuration
- Open Noctalia Settings → Plugins → Home Assistant → Configure
- Enter your Home Assistant URL (e.g.
http://homeassistant.local:8123orhttp://192.168.1.x:8123) - Enter your Long-Lived Access Token
- Click Save
Getting a Long-Lived Access Token
- Open Home Assistant in your browser
- Go to your Profile (bottom-left avatar)
- Scroll down to Long-Lived Access Tokens
- Click Create Token, give it a name (e.g.
Noctalia) - Copy the token and paste it into the plugin settings
Usage
Bar Widget
Click the 🏠 icon in the bar to open the panel. The icon color reflects the connection state:
| Color | Meaning |
|---|---|
| Primary (accent) | Connected and authenticated |
| Pulsing | Connecting / authenticating |
| Error (red) | Disconnected |
Control Center Widget
Click the 🏠 icon in the control center to open the panel. The icon color reflects the connection state:
| Color | Meaning |
|---|---|
| Primary (accent) | Connected and authenticated |
| Pulsing | Connecting / authenticating |
| Error (red) | Disconnected |
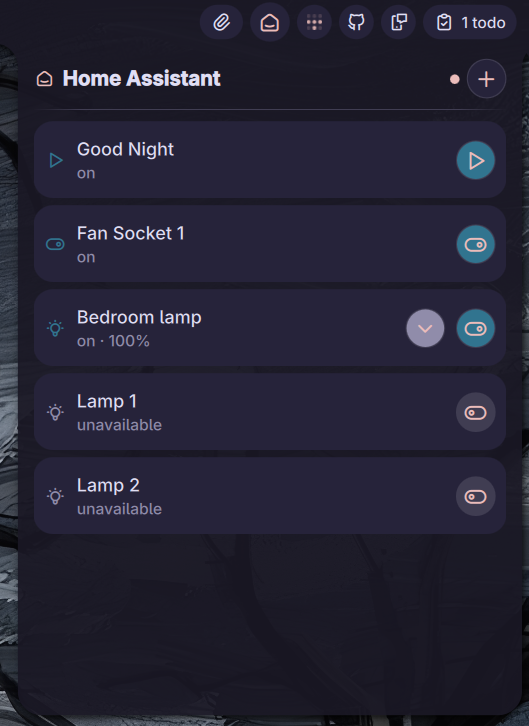
Panel - Entity List
Shows your pinned entities. Each entity row displays:
- Domain icon colored by state (on/off)
- Friendly name and current state / sensor value with unit
- Toggle button for controllable domains (lights, switches, fans, locks, covers)
- Trigger button for automations and scripts
- Chevron to expand brightness/color temp controls for lights
Panel - Light Controls
Tap the chevron on any light row to expand inline controls:
- Brightness slider - drag to adjust, tooltip shows percentage, sends to HA on release
- Color temperature slider - cool to warm, tooltip shows Kelvin value
Panel - Entity Browser
Click the + button in the panel header to open the entity browser:
- Search by friendly name or entity ID
- Pin/unpin entities with the pin button
- Pinned entities appear immediately in the main list
File Structure
hassio/
├── manifest.json       # Plugin metadata
├── Main.qml            # WebSocket service, entity state, reconnect logic
├── BarWidget.qml       # Bar icon with connection status
├── ControlCenterWidget.qml # Controlcenter Icon with connection status
├── Panel.qml           # Main panel - entity list and browser switcher
├── BrowserView.qml     # Entity browser with search and pin controls
├── Settings.qml        # URL and token configuration
├── preview.png         # Plugin preview image
└── README.md           # This file
Supported Domains
| Domain | Control |
|---|---|
light |
Toggle + brightness + color temperature |
switch |
Toggle |
input_boolean |
Toggle |
fan |
Toggle |
cover |
Toggle |
lock |
Toggle |
sensor |
Read-only (value + unit) |
binary_sensor |
Read-only |
weather |
Read-only |
automation |
Trigger |
script |
Trigger |
climate |
Read-only (state shown) |
media_player |
Read-only (state shown) |
Permissions
settings_read/settings_write- to store HA URL, token, and pinned entity list
Troubleshooting
Widget shows red / disconnected
- Check that your HA URL is reachable from your machine:
curl http://your-ha-url:8123 - Make sure
qt6-websocketsis installed - Try
http://nothttps://unless you have a valid certificate
Authentication failed
- Re-generate your Long-Lived Access Token in HA and paste the new one into Settings
- Make sure there are no leading/trailing spaces in the token field
Entities not appearing after pinning
- The plugin reads
supported_color_modesfor light capability detection - requires HA 2022.5 or newer - Check the Noctalia logs:
NOCTALIA_DEBUG=1 qs -c noctalia-shell 2>&1 | grep HASS
Color temperature not working
- This plugin uses
color_temp_kelvin(requires HA 2022.9+). Older HA versions using mireds only are not supported.
License
MIT
Author
Pozzoo - github.com/Pozzoo
Contributors
johnstef99 - github.com/johnstef99